Install Language Packs on Windows 10-11 the easy way
I have a lot of customers who want to give their end users a localised experience with AVD and W365. This means that they install language packs onto the Session Hosts and configure it either with GPO or scripts so end users will have their session in their own language.
I know from experience that working with language packs is not that easy. We are talking about Language (interface) pack and also about the Features on Demand like spell check, fonts, handwriting, text-to-speech etc. You need to download the correct versions, need multiple files and also some scripting knowledge to get it working.
Today I came acros a post from Scott Breen where he gave an update about a new way of installing languages on Windows 10 20H2+ and Windows 11 without the need to download and script all of this. In this post I will show you how you can easily make new languages available and even configure it is as the default language.
According to Microsoft this new PowerShell Module allows users to easily add languages and related language features and manage settings like System Preferred UI Language, System Locale, Input method (Keyboard), Locale, Speech Recognizer, User Preferred Language List using the new cmdlets.
You can use this cmdlet during the build of Master Image for AVD or Windows 365 for example. You can also use this during for example an Autopilot deployment or deploy it as an application via Intune. For this blog I will focus on AVD and how you can use these cmdlets in an Scripted Action with my favorite tool Nerdio Manager for Enterprise.
Table Of Contents
Requirements
- For the new PowerShell module to work you need the latest cumulative update previews for Windows 10 20H2 and above or Windows 11. (I have tested it on Windows 11 22H2 OS Build 22621.382)
- For the Install-Language and Set-Language cmdlets you must run the PowerShell as an admin
Get current installed languages using PowerShell
Open up PowerShell and fire up the following command
Get-InstalledLanguage
You will get a list of all the installed languages, which Language Pack is installed and what Features are available.
Install language using PowerShell
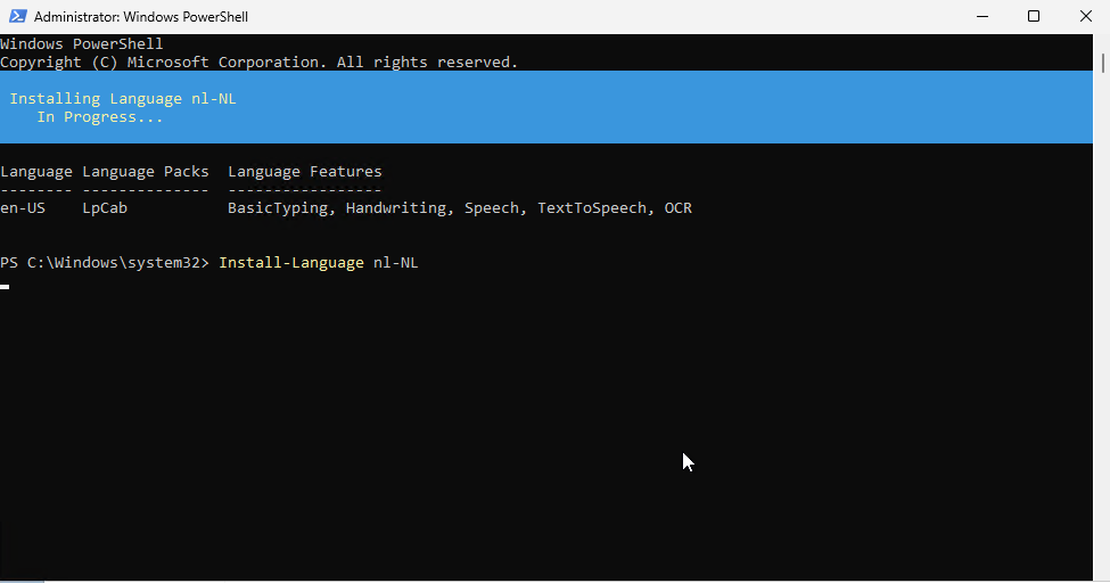
Open up PowerShell as an administrator. Use the following command to install a language pack. For a list of available languages you can check out this overview from Microsoft over here . For this command to run you need the Language/region tag also known as the bcp47 tag. When you use this cmdlet you need to provide the language tag and optional you have a few parameters.
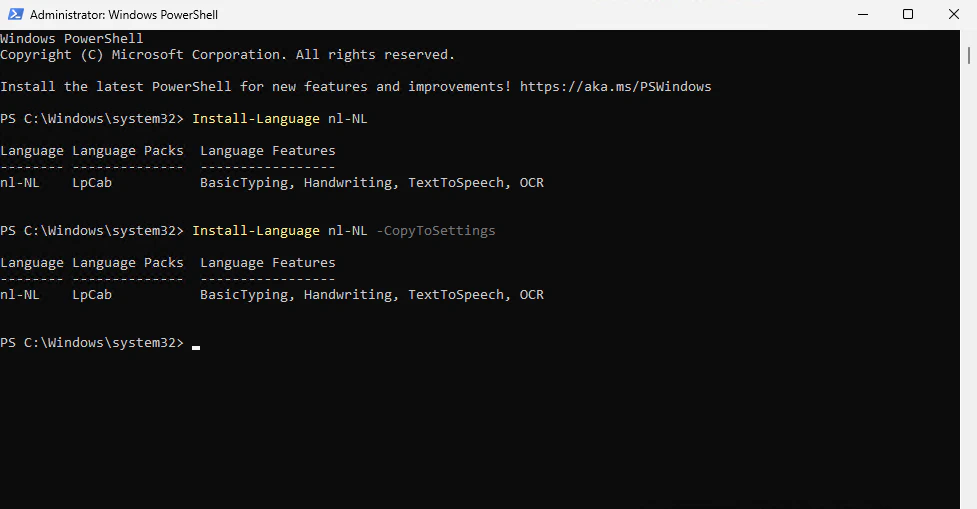
Install-Language nl-NL
This cmdlet will download and install the available language components for the language you specified.
-CopyToSettings parameter
If you specify this parameter the cmdlet will set the System and Default Device Settings (Windows Display Language, regional and locale formats) to the installed language. If you use this command you have to restart the device or login again for the changes to take effect.
Here you can exclude certain language Features on Demand like OCR, TextToSpeech or Handwriting.
Set and check the default language using PowerShell
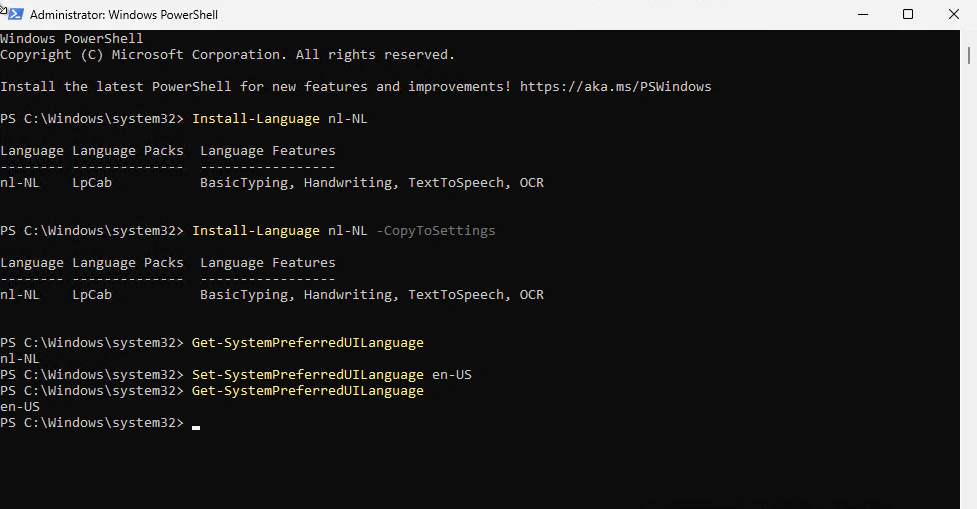
There are multiple ways you can set a default language as the System preferred UI Language. You can use the previous command with the -CopyToSettings parameters. But you can also use the following command to configure the default language. For both the options you will need to restart the device or login again for the changes to take effect.
Set-SystemPreferredUILanguage
To check the default language configured use
Get-SystemPreferredUILanguage
You see, no more preparing the correct content for all the languages and features. No more downloading different files for different version of Windows. An extreme easy way to install new language, uninstall languages
Nerdio Manager for Enterprise
Scripted Actions in Nerdio
Like I said in the beginning of this post, there are multiple ways you can use this cmdlets. I have created a super simple script to install multiple languages and to configure the default language. The only things you need to provide within the script are the languages you need to install and which language needs to be configured. I have created this script so I can use it with Nerdio.
Scripted Actions are extremely powerfull to performs all kinds of actions on your Azure Virtual Desktop or Windows 365 session hosts. See it like a library of PowerShell scripts which you can run during the VM Provisioning process or for example manually on all the hosts within a certain hostpool. Or use it during the creation of Images with Nerdio.
Create a Scripted Action
Like almost everything within Nerdio Manager for Enterprise it’s a simple process to create a custom Scripted Action. There a two way’s you can create and use Scripted Actions. You can just create a new script and host it in this installation of NME or you can use your own repository to develop and deploy new scripts which can be used within multiple NME installations.
Navigate to Scripted Actions, select Windows scripts and scroll to the bottom of the page. There you will see a buttom Add scripted action. You will see the following screen where you can create your own Scripted Action.
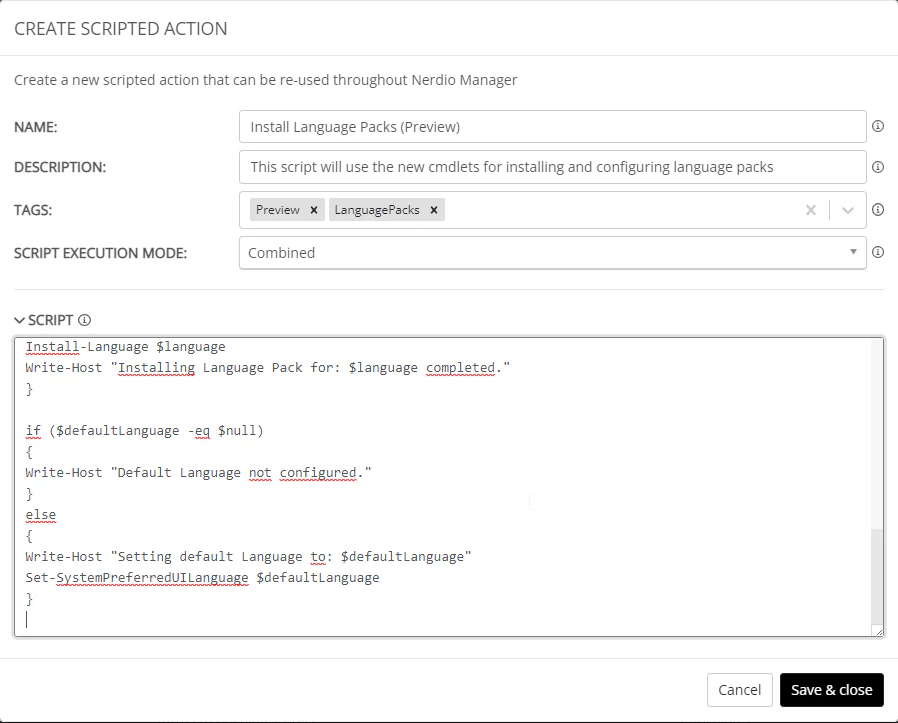
You will have to give it a name and for your own administration a description and/or tags. You can configure how this script can be executed. Scripted Actions will run as a Script Extension on your VM’s in Azure. You can choose different options for the execution mode. Since the Script Extension needs to be installed and removed every time we used it we can configure the execution mode to Combined. Scripts in this mode will be combined all together and thus saving time.
If you have a script which should be run on his own you can choose for Individual. For this example I will use Individual with restart. Why? I think these kind of customizations we need to at least ensure the machine has been restarted. I would recommend to use this script before installing the applications and other customizations.
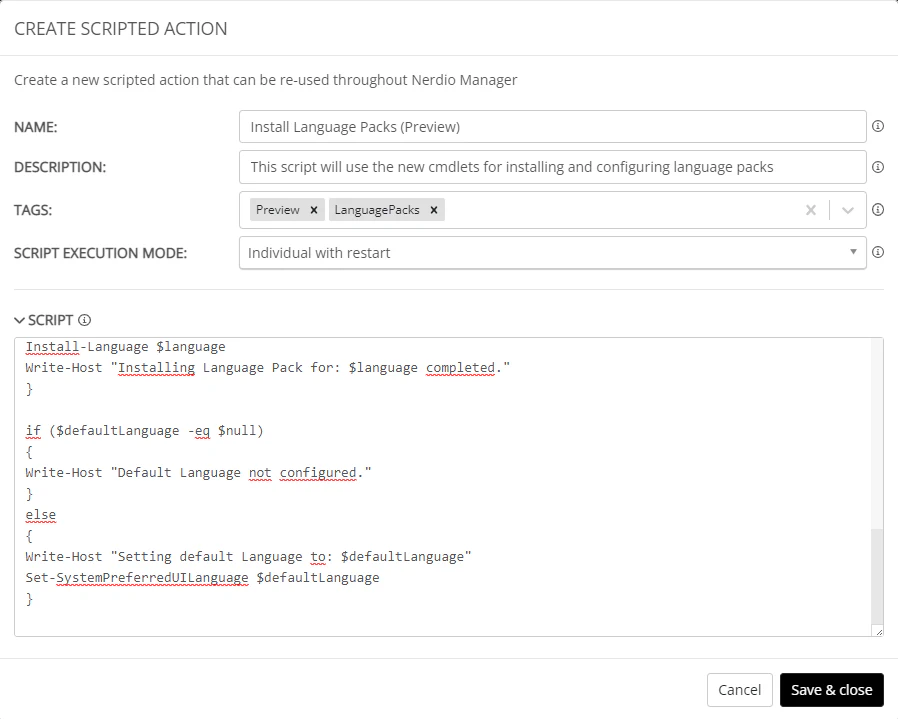
Just copy and paste your PowerShell code in the Script pane and you are ready to go. Hit Save & close and you are ready to use it! The script is available on my GitHub because I want to integrate it within Nerdio. In the next chapter you will find the script, for the latest version go to GitHub
Install Language Packs (Preview)
.SYNOPSIS
Script to install and configure Language Packs via Install-Language

.DESCRIPTION
This script will use the new cmdlets for installing and configuring language packs See https://docs.microsoft.com/nl-nl/powershell/module/languagepackmanagement/?view=windowsserver2022-ps for more information. For this script to work you need at least Wind

.PARAMETER languagePack
This is the language code for the language(s) you want to install

.PARAMETER defaultLanguage
This is the language code for the default language you want to configure

.DOCS
Available languages: https://docs.microsoft.com/en-us/windows-hardware/manufacture/desktop/available-language-packs-for-windows?view=windows-11
New PowerShell cmdlets: https://docs.microsoft.com/nl-nl/powershell/module/languagepackmanagement/?view=windowsserver2022-ps

.LINK
https://github.com/StefanDingemanse/NMW/edit/main/scripted-actions/windows-script/Install%20languages.ps1
$>

# Customize the following variables
$languagePacks="en-US","nl-NL"
$defaultLanguage="nl-NL"

# Start powershell logging
$SaveVerbosePreference = $VerbosePreference
$VerbosePreference = 'continue'
$VMTime = Get-Date
$LogTime = $VMTime.ToUniversalTime()
Start-Transcript -Path "C:\Windows\temp\NMWLogs\ScriptedActions\languages\ps_log.txt" -Append
Write-Host "################# New Script Run #################"
Write-host "Current time (UTC-0): $LogTime"
Write-host "The following language packs will be installed"
Write-Host "$languagePacks"

#Disable Language Pack Cleanup (do not re-enable)
Disable-ScheduledTask -TaskPath "\Microsoft\Windows\AppxDeploymentClient\" -TaskName "Pre-staged app cleanup" | Out-Null

# Download and install the Language Packs
foreach ($language in $languagePacks)
{
Write-Host "Installing Language Pack for: $language"
Install-Language $language
Write-Host "Installing Language Pack for: $language completed."
}

if ($defaultLanguage -eq $null)
{
Write-Host "Default Language not configured."
}
else
{
Write-Host "Setting default Language to: $defaultLanguage"
Set-SystemPreferredUILanguage $defaultLanguage
}

# End Logging
Stop-Transcript
$VerbosePreference=$SaveVerbosePreference
Deploy the Scripted Action
Next step is to deploy our Custom Scripted Action to a Session Host. You can run the command against a Host Pool or a single VM. You can use this method for example to install, update or configure applications, settings or languages without re-imaging your VM’s. I would always recommend to use for testing and emergency fixes. Every other change you will have to make to your Golden Image/Master Template for a consistent environment.
Navigate to your Workspaces, Dynamic(or static) host pools. Select your Host Pool and click on the Action menu and select Run script.
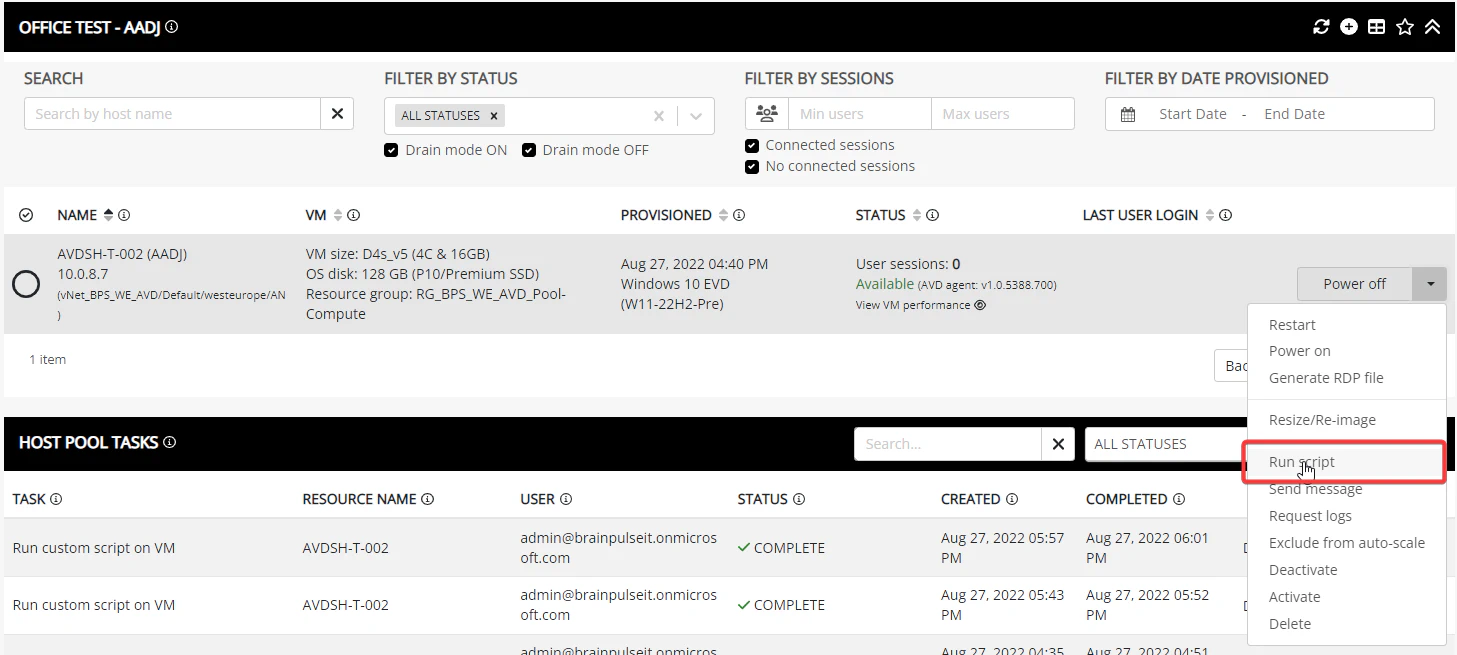
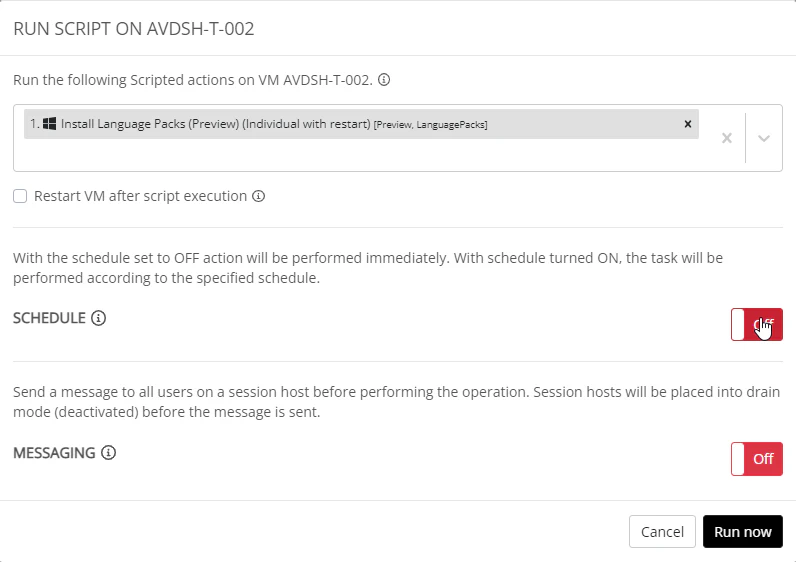
Now it’s time to run the script. After you click on Run now you can see the details of this jobs within the Tasks pane. After a few seconds you will that this Scripted Action is in progress and you will see the result of the script on the VM you selected.

The script will place a transcript in C:\Windows\Temp\NMWLogs\ScriptedActions\languages, you can use this for troubleshooting or to validate the script worked. If the script worked you should see the configured languages being available on your Session Hosts and the default Language must be configured.
I hope you enjoyed reading this post, if you have any comments or feedback please contact me.
Have an awesome day!
Sources
Overview of Scripted Actions – Nerdio Help Center Available Language Packs for Windows | Microsoft Docs LanguagePackManagement Module | Microsoft Docs